![]()
(7/11/2005 - 7/19/2005) - Its been exactly 1 year and 3 days since the fateful day the bug died... I decided it was time to resurrect it - somewhat. In reality, we have some other projects going on out at the hanger and I just wanted to make it driveable so that it can be moved around easily (IE: I'm tired of pushing it!).
I already had a bunch of spare parts, and thanks to the parts donation by Anthony Hyde, I ended up having more than enough to build a "spare parts engine." I figured this engine would never see 5,000 miles of use (IF that) - so I was able to break a few rules to build it up - more on that later.
Lets get to the destruction pics! Oh the humanity!
![]()
First things first - I drained the oil... On a normal healthy engine this would be BAD.
Nothing was stuck to my magnetic drain plug which told me that this was probably all aluminum.
.JPG)
![]()
Then I pulled the engine and started removing the tin, etcetera. Below you can see the two large holes in my block.
.JPG)
![]()
Below is my oil sump. You can begin to see all the chunks (and the piece of piston ring).
.JPG)
![]()
After pulling the carbs you can see all the shrapnel in the #4 exhaust port.
.JPG)
![]()
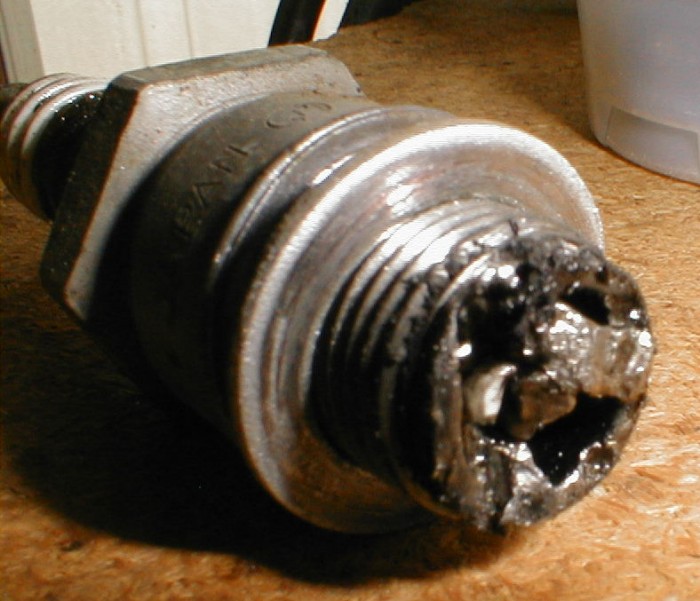
Here's my $$$ NGK spark plug from the #4 cylinder.
![]()
When I popped the valve cover off the #4 side I found this:
Yup! Broken valve spring! (which most likely started the chain reaction ruining my engine).
.JPG)
![]()
Here is one of my custom super-heavy-duty aluminum pushrods - VERY bent!
.JPG)
![]()
Here's the #4 chamber of my Stage 3 cylinder head. The exhaust valve was complete broken (I never found it) - the stem was still in the guide (seized). The intake valve was bent and seized also. You can see the chunk of piston lodged in the exhaust port.
.JPG)
![]()
Here's where all the shrapnel came from! That is the largest piece of the #4 piston I could find!
.JPG)
.JPG)
![]()
After cleaning some of the shredded piston out you can see another piece of piston ring wrapped around rod (which is bent).
.JPG)
![]()
This is the bore of the #4 cylinder - you can see where the wristpin chewed it up (and cracked it). The wristpin actually turned out to be useable again!
.JPG)
![]()
Here's one of the other pistons that also got damaged (see the skirts)
.JPG)
![]()
Normally the case halves are pretty hard to split due to the Yamabond sealer that I use. In this situation, however, I was not worried about damaging the case - so I just pried it open with a screwdriver :-)
Now you can see where the rest of my piston went!
.JPG)
.JPG)
![]()
You can see that the 2 holes in the top of my block was actually 1 big hole - some pieces "fell off" during disassembly.
.JPG)
![]()
I was really crossing my fingers that my cam would be salvageable. And at first it looked fine! But then I tried to pull it out of the case... It came out - In 2 pieces! Argh.
Apparently some of the shrapnel got in between the gears causing a high shear force on the cam - so it broke. I was able to salvage the straightcut gears however!
My SLR coated lube-a-lobe lifters were also re-useable!
.JPG)
![]()
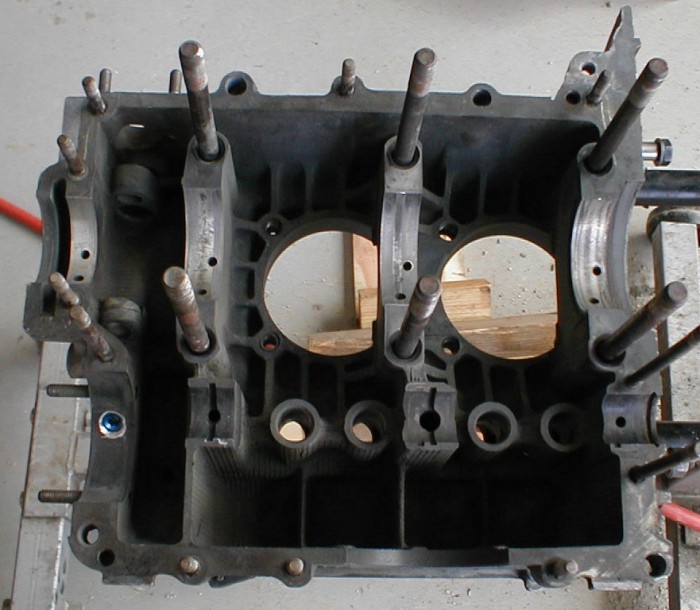
Here's what's left of the block after disassembly:
.JPG)
.JPG)
.JPG)
.JPG)
.JPG)
![]()
If you look closely you can see the bent rod. Believe it or not - after stripping and measuring the crank, it turned out to be PERFECT!
It looks like my full flow filter actually saved the crank - and the bearings weren't even that bad!
.JPG)
![]()
So what happened to it??? Best I can tell the #4 exhaust valvespring failed. From there it was simply a chain reaction: The retainers fell off, Valve extends into #4 cylinder at around 3500RPM (I was on the freeway), and the piston makes contact - KABOOM! Trashes the piston, cylinder, head, bends the rod, trashes the block, breaks the cam, etcetera. All because of a measly valvespring!
![]()
The buildup BEGINS!
I wanted to use my old 8mm head stud block - but it was the one with cam thrust wear damage - so I opted not to use it. I ended up using an AS41 block with 10mm head studs. Wouldn't be my first choice - but considering how this engine will be used, It wont be a problem. Did I mention its been line bored twice? :-) I scrubbed this block in the parts washer for HOURS and HOURS. It actually came out very nice!
It measured fine - so I went ahead and drilled and tapped it for full flow (I DIDN'T tap all the galleys - JUST what I needed for full flow). Again, I took a shortcut because I don't expect it to see that many miles anyway.
.JPG)
![]()
Here's the crank with a different set of rods installed. I removed the straightcut cam gear and installed a stock unit. The only thing "new" here are the kolbenshmidt bearings. I ended up only needing rod bearings, main bearings, and rings. I already had a new set of Mahle double thrust cam bearings.
.JPG)
![]()
I had several stock cams sitting around, so I simply picked the best one. I also re-used the distributor gear, wrist pins, and SLR coated lube-a-lobe lifters (below).
.JPG)
![]()
I ended up beadblasting and painting a few things to make them look a little better (pushrod tubes, cylinders and head studs).
The cylinders are off of an engine I picked up about 4 years ago from the junkyard. After honing them, they measured out great!
.JPG)
![]()
Starting to get things re-assembled.
.JPG)
.JPG)
![]()
I sealed the case - and realized I FORGOT to install the steel (grooved) cam plug ARGH! Luckily I had an extra one that just taps in like a seal. They aren't as good IMO, but for this engine it will be good enough.
I also purchased a cheap set of rings for this buildup. I was able to re-use many of the AN fitting for my full flow filter setup.
Below you can see things really starting to come together:
I decided to just go with a set of stock heads since my Stage 3's were damaged. I was also able to re-use my Scat 1.4 ratio rockers! (luckily I had some extra pushrods around that were the correct length).
.JPG)
.JPG)
.JPG)
.JPG)
.JPG)
![]()
Here it is installed!
.JPG)
![]()
And here it is with the bumper back on.
After filling it with oil (and filling the filter), It pretty much started right up! Although it wasn't running very good. Cylinder #1 and #2 ran great but #3 was barely hitting, and #4 wasn't firing at all. I spent over a day trying to fix it. In the end it turned out to be 2 faulty plug wires! After replacing them with some others I had lying around, it runs great!
.JPG)
I let the registration and insurance lapse on the car, so its not legal to drive on public roads in - but there are several miles of roads at the airport (which is private property), so I was able to drive it around.
![]()
Engine Summary: I spent about $100 (including a new $30 wal-mart battery) to get it running. If I wanted to build it back to the way it was before, I estimate it would have easily been $2,500 plus a months worth of blueprinting. The engine itself is basically the same as it was before with the exception of stock heads, stock cam, and a 10mm head stud block.
I put in some LONG days disassembling one engine and building this engine - I was able to get it all done in 9 days!! That's a record for me (it usually takes 2 months; ha!)
![]()
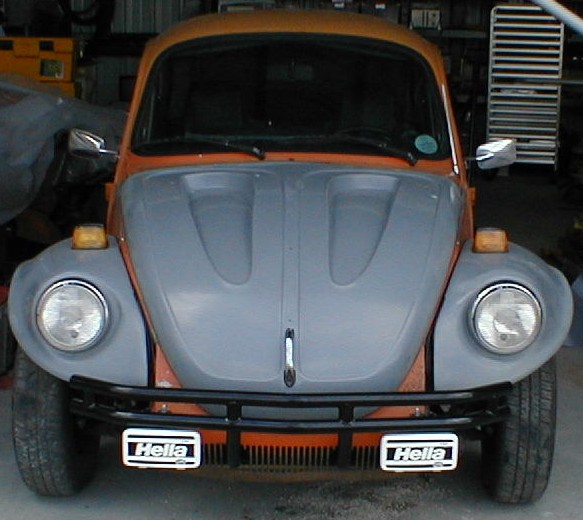
After I got all that done, I decided to install my front Baja bumper and Hella driving lights. The Hella's were sitting in a brand new box in the trunk. The front bumper had been freshly powdercoated over a year ago - it was just sitting in the back seat.
.JPG)
.JPG)
.JPG)
.JPG)
![]()
And here they are all lit up.
.JPG)
.JPG)
.JPG)
Its looking pretty good...
![]()
Yeah, that'd be me:
.JPG)
![]()
THE END.
![]()
![]()